when you have the basic shape, you need the outside triangular piece To make it you need buckles and a piece of leather that's been cut like the shape above,
...and the buckles attached to it with duct tape.
here you can see how i sewed the release buckles on
Then attach the other sides of the release buckles to the bag
So the bag will look like this when you snap the buckles into place
After you make this you need the top round cap that's on the bag this can be made out of
FIMO and painted black and silver. and attach it to the bag using glue such as
this picture below, and the clasp slightly higher attached by stitching to the
top fold of the bag
PART TWO: The shoulder straps of the bag
I made two almost triangular pieces from pleather and sewed them on like this :
and two more rectangular pieces to make the top pieces
then attach pieces of thin pleather to make the underarm parts, make sure you
measure it to make a snug fit
Now its time to make the D-ring loops , just thin pieces of pleather and attach
the D-ring by sewing and making sure the opposite side of the D-ring has a loop
so you can slide them into the chest pieces
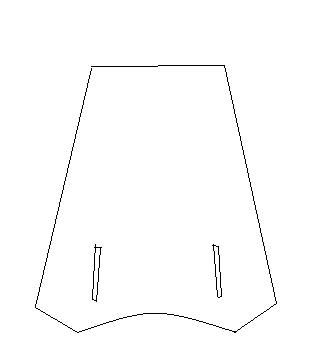
Time to make these front pieces now:
You need to cut out some pleather into this shape:
After i cut them out of pleather i sewed them to prevent tares
Then make two cuts in the middle, where the centre strap will go through it.
Slide these into the chest pieces like so then the D-ring pieces then through it
one more time:
You'll end up with this:
The centre strap is laced with Velcro and can open and close by putting one on top of the other
Hopefully this helps and what you end up with is this: