|
How to make the Tomb Raider Underworld Shorts - by Nehta of
www.Nehta.ch
 |
Le jeans que vous portez en
ce moment, lŕ, vous l’aimez bien, il vous va bien et męme : c’est votre
préféré ?
Enlevez-le et utilisez du papier pour fabriquer votre patron avec ! Eh
ouais en slip direct pour le short, les filles. On va bien se marrer. |
The jeans your are wearing,
now, you like it, it fits well on you and it’s your favourite one ?
Take it off and use it to create your pattern with it ! That’s it :
you’re wearing pants in front of your sewing machines for your shorts,
girls. We’ll have fun. |
|
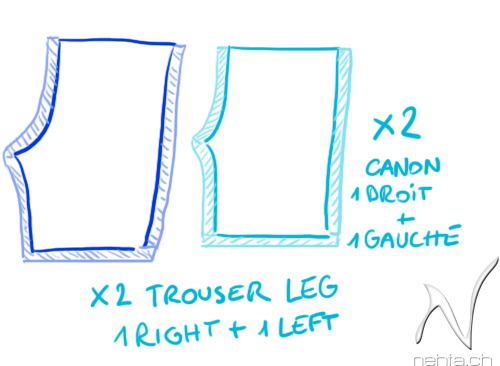 |
Vos patrons devraient
ressembler ŕ ce qui apparaît ci-dessus. Les hachures représentent les
marges auxquelles il faudra toujours penser. Vous pouvez ne faire que
deux patrons mais alors ne vous embrouillez pas entre le canon droit et
le gauche ;) soyez généreuses et comptez large sur la longueur des
canons, vous n’en serez que plus libres pour choisir la longueur finale
de votre short.
Vous allez pouvoir assembler les deux moitiés de canon de derričre ou
autrement dit les deux pans de tissu passant sur vos fessiers (ceux dont
la courbe se terminant par une pointe est la plus prononcée – ŕ gauche
en bleu foncé sur le schéma précédent) comme suit: |
Your patterns should look
like the drawing above. The hatching are for the margins you will have
to think everytime. You can only create 2 patterns instead of 4 but
don’t become muddled between the right and the left trouser leg ;) be
generous for the trouser legs, like that you will be able to choose the
length of your shorts at the end.
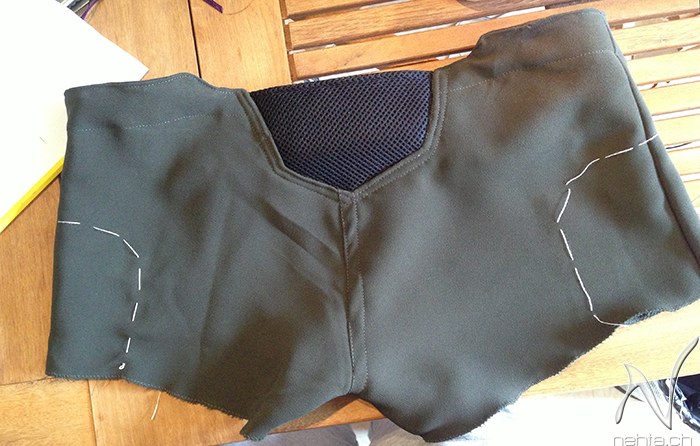
You will be able to assemble the two halfs of trouser legs that will be
on your buttock muscles (dark blue on the scheme above) like in the
following picture :
|
|
 |
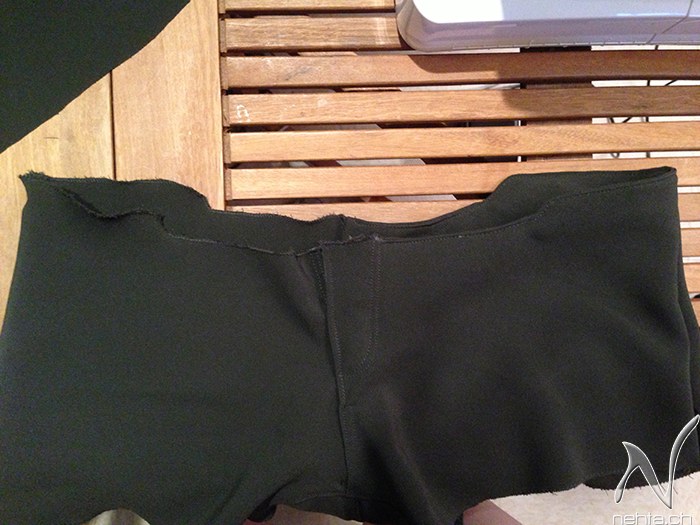
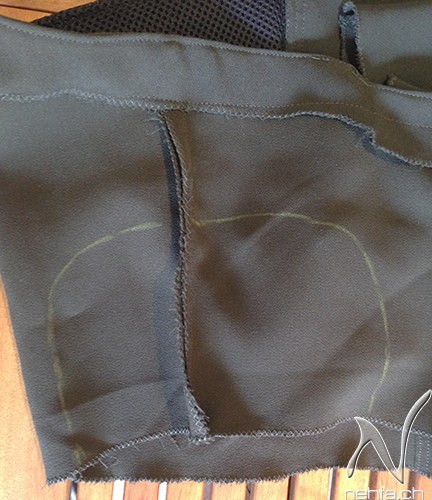
Prenez maintenant l’un des
deux pans de tissu restant (forcément un devant de canon) et cousez
le ainsi : |
Now take one of your two
pieces of fabric and sew it this way:
|
|

 |
| Prenez ŕ présent le dernier
pan pour terminer la couture de l’entrejambe et faites de męme : |
Now take the last piece of
fabric to end the sewing of the crotch and do it the same way : |

 |
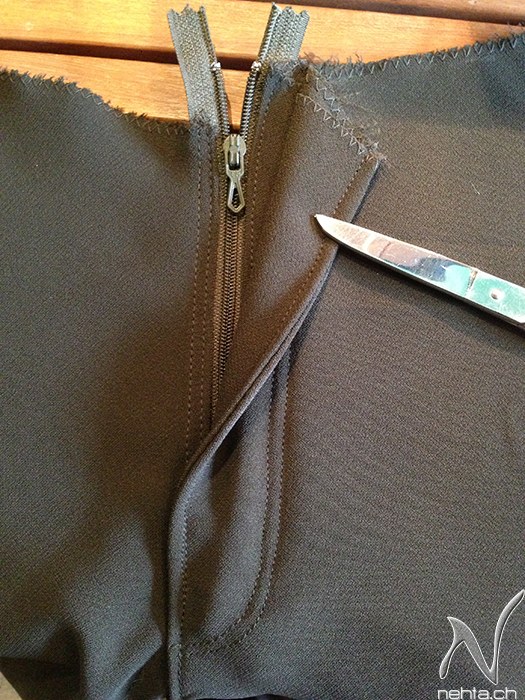
| Maintenant placez la
fermeture éclair. Je ne vous montre pas comment j’ai fait car c’était
pas vraiment dans l’ordre et je risque plus de vous embrouiller qu’autre
chose ! Je vous laisse le soin de visionner l’un des trčs nombreux tutos
vidéo disponibles sur le net. |
Now place the zip. I won’t
help you by showing you how I did because it was not in the right order
and I had to improvise a bit. I let you watch one of the many videos
available on the internet.
|
 |
| Vous pouvez maintenant
coudre les côtés latéraux de votre short puis l’enfiler devant votre
miroir pour déterminer ce qui est de trop ŕ ôter (sans oublier de
laisser de quoi faire un ourlet ŕ la fin). |
You can now sew the lateral
sides of the short and try it in front of the mirror to see if it’s too
big (don’t forget to keep a margin for the hem at the end).
|
 |
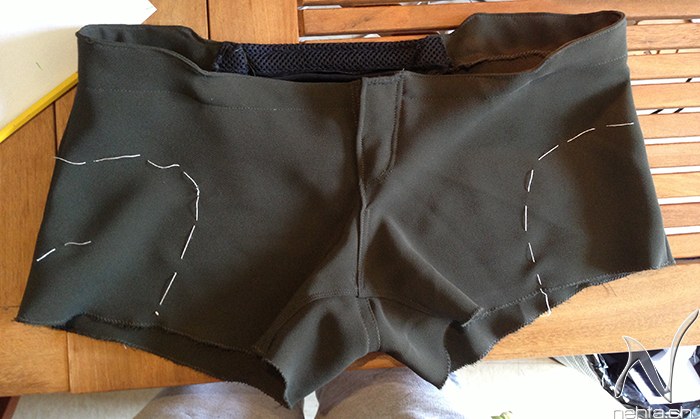
(quand je vous disais de
compter large… !)
Voici comment vous allez vous y prendre pour l’ourlet supérieur du short
et les fameux décrochés sur les hanches. Vous avez découpé la taille de
votre short telle que vous la souhaiterez au final (partie gauche ici,
la droite est déjŕ faite): |
(when I told being generous
with the length.. !)
This is how you’re going to manage the upper hem and those famous
recesses on the hips. You cut the shape you want to be at the end (left
side here, the right one is already done) :
|
 |
| Retournez votre short ŕ
l’envers : |
Put your shorts inside out
: |
 |
| Placez un tissu sur le
pourtour (cela ne dérange pas de s’arręter au milieu du dos puisque de
toutes façons il y aura la résille ŕ cet emplacement), en laissant bien
dépasser puis cousez ŕ ras du bord: |
Place a piece of fabric on
the perimeter (it doesn’t matter that it stops in the middle of the back
side because the mesh fabric will be inserted at that place), make it
jut out above the short and sew to the brim : |
 |
| Retournez votre ouvrage de
façon ŕ l’avoir ŕ l’endroit: |
Turn it inside out to get
it the right side up: |
 |
| Rabattez maintenant le
tissu vers l’intérieur du short et faites-le tenir grâce ŕ du fil de
bâti. C’est le moment de soigner les virages du décrochement sur les
hanches : |
Pull the fabric down to the
inside and make it hold using basting stitches. It’s time to take care
over the bends of the recesses on the hips :
|
 |
| Piquez en suivant bien le
bord (environ ŕ 5mm), puis, pour profiter des épaisseurs du tissu qui se
trouvent dans le short et qui servent ŕ un meilleur maintien, vous
pouvez coudre tout le tour (ce sera caché par la ceinture). |
Stitch along the edge
(about 5mm), then use the thicknesses offered by the surplus inside the
short to make a better preservation of your work. You can sew all around
(this will be hidden by the belt).
|
 |
Incrustation de la résille
au fond du dos :
Avant toute chose, placez un tissu derričre votre résille pour la rendre
opaque. Repérez l’emplacement sur votre short et reportez la géométrie
sur la résille ŕ l’aide de fil de bâti. |
Integration of the mesh
fabric in the bottom of the back :
Before all, sew a black fabric behind the mesh fabric to make it opaque.
Mark the place on your short and carry the geometry to the mesh fabric
by basting stitches. |
 |
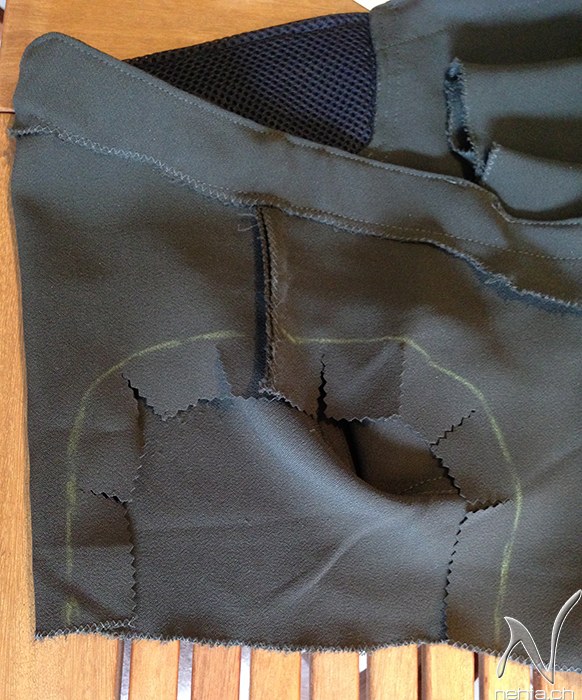
J’ai testé une autre façon
d’intégration pour cet empičcement. Comme ce sera majoritairement
dissimulé par la ceinture, je ne prenais pas trop de risques.
Découpez les entailles dans le short afin d’accueillir la résille. |
I tested another way of
integration for this yoke. As this will be mainly covered by the belt, I
didn’t took much risk.
Cut some notches into the short to recieve the mesh fabric.
|


 |
L’effet sur cet endroit ne
m’a pas autant plu que sur le débardeur, alors j’ai incrusté les pičces
de résille latérales avec la méthode du débardeur.
Afin d’assurer mon coup j’ai d’abord effectué un test dont voici les
étapes en détail : |
The effect it did on that
place didn’t please as much as on the top, so I did the rest of the mesh
fabric the way I did for the top.
To make sure I had the right method, I first made a try which details
are just below :
|
 |
| Reportez la technique sur
votre short : enfilez –le et déterminez l’emplacement de la résille ŕ
venir avec votre fil de bâti. |
Use that technique on your
short : wear it and choose the place where you will insert the mesh
fabric with basting stitches. |
 |
| Reportez précisément la
géométrie sur la résille doublée au préalable. Le long trait représente
la couture latérale du short et vous aidera pour le positionnement de la
résille avant couture (et ŕ dissocier laquelle des deux ira sur votre
cuisse gauche ou droite). |
Carry precisely the shape
forward to the mesh fabric (you first put a lining behind it). The long
basting stitch depicts the position of the lateral sewing and will help
you to get the position of the mesh fabric (and to know which piece of
mesh fabric is for left or right leg). |
 |
| Le fil de bâti placé sur le
short va vous servir ŕ reporter ŕ l’intérieur du short la géométrie pour
l’incrustation. N’utilisez rien d’autre que du crayon (blanc, jaune,
pourvu que vous le voyez bien)! |
The basting stitches placed
on the short will serve to carry the shape forward for the inlay. Use
nothing but white pencil (or yellow, it just has to be easy to see) !
|
 |
| Retournez votre short ŕ
l’envers : |
Turn the short inside out : |
|
 |
| Préparez le tissu pour
accueillir la résille. Mais oui, allez-y, hop un bon coup de ciseaux (contrôlé
bien sűr)! Ça fait du bien hein ! Non ? Tant mieux parce qu’il va
falloir s’appliquer maintenant ^^ |
Prepare the fabric to
receive the mesh fabric. Yeah, go on, cut it ! What a great feeling,
isn’t it ! No ? Anyway you’ve got to take care of the following :
|
 |
| Comme sur les photos de mon
test, apposez le tissu sur la résille. Sur la photo suivante, j’ai tâché
de superposer la ligne jaune du short sur la ligne du fil de bâti de la
résille. J’ai fixé cela grâce aux épingles puis, par anticipation et
afin de faciliter la couture qui suivra, j’ai également cherché ŕ
écarter les plis formés sur la ligne jaune en cousant du fil de bâti en
retrait (vers l’intérieur). Vous allez trčs vite en saisir la raison ;) |
Like on the pictures of the
test I did before, place the fabric on the mesh fabric. On the following
picture, I superimposed the yellow line of the short on the basting
stitches that are on the mesh fabric. I fastened it with pins and to
make the sewing easier, I add some basting stitches to make the creases
go away.
|
 |
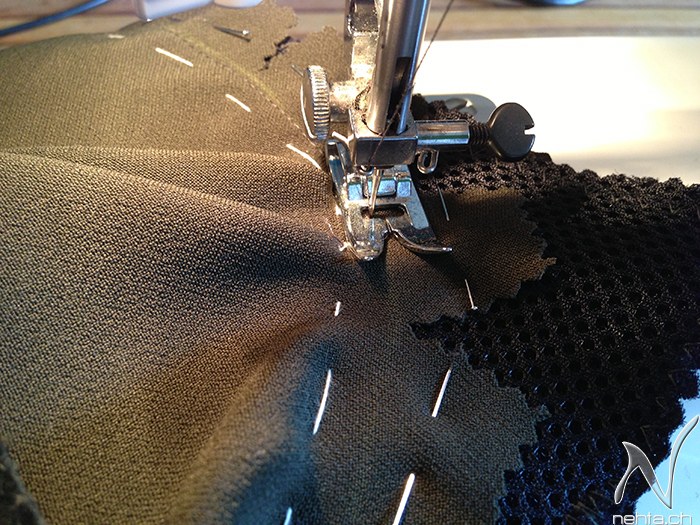
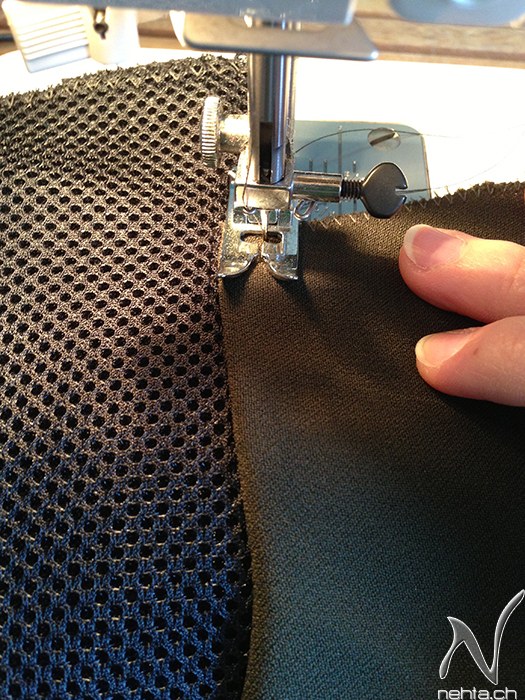
| Cousez maintenant en
suivant le mieux possible votre ligne tracée au crayon (ici en jaune).
Évitez ŕ tout prix qu’un pli se forme sur votre passage! C’est en cela
que le fil de bâti va vous épargner beaucoup de pression ! |
Sew along the yellow line
the best you can. Avoid creases at all costs ! The basting stitches
should help you out.
|
 |
| Vous pouvez, si vous le
voulez, coudre une deuxičme rangée vers l’extérieur. |
You can, if you want to,
sew a second row toward the exterior.
|
 |
| Retournez votre ouvrage et
cousez ŕ 1cm environ du bord de la transision entre la résille et le
tissu. Tirez légčrement le tissu ŕ la perpendiculaire du pied de biche
afin d’éviter la formation de boudinets. |
Turn your work inside out
and sew 1cm along the transition between the mesh fabric and the green
fabric. Pull lightly the fabric perpendicularly to the presser foot.
This will help flatting the transition.
|
 |
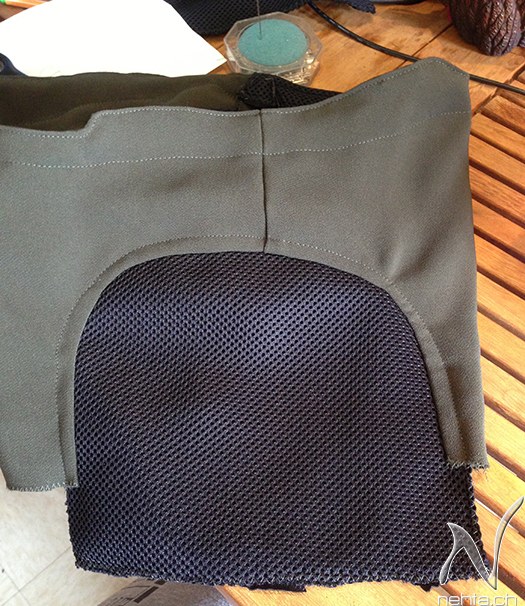
| Voici le résultat. Sur la
droite j’ai pas tiré le tissu comme il le fallait. Tant pis pour moi, ça
fait l’exemple pour vous ;) |
Here is the result. On the
right of the picture I didn’t pulled the fabric as I should have done.
Too bad for me, but it makes the example for you ;) |
 |
Vous pouvez maintenant
raccourcir vos shorts ŕ la longueur souhaitée avec un petit ourlet.
Et voilŕ le fruit de vos efforts ! Au fait, vous pouvez remettre votre
jeans maintenant. |
You can shrink your shorts
the length you want by sewing a hem.
Here is the result of your efforts ! Oh, you can wear your jeans now.
|

|
Thank you so
much Nehta, for allowing us to post this tutorial:
http://www.nehta.ch
https://www.facebook.com/pages/Nehta/88502969435 |